
Tonybio/EnzymeHunter
EnzymeHunter
Overview
EnzymeHunter: Achieving fine-grained enzyme function prediction with a hierarchically-aware contrastive learning framework. This source code was developed and tested on Linux (CentOS) with Python 3.9.
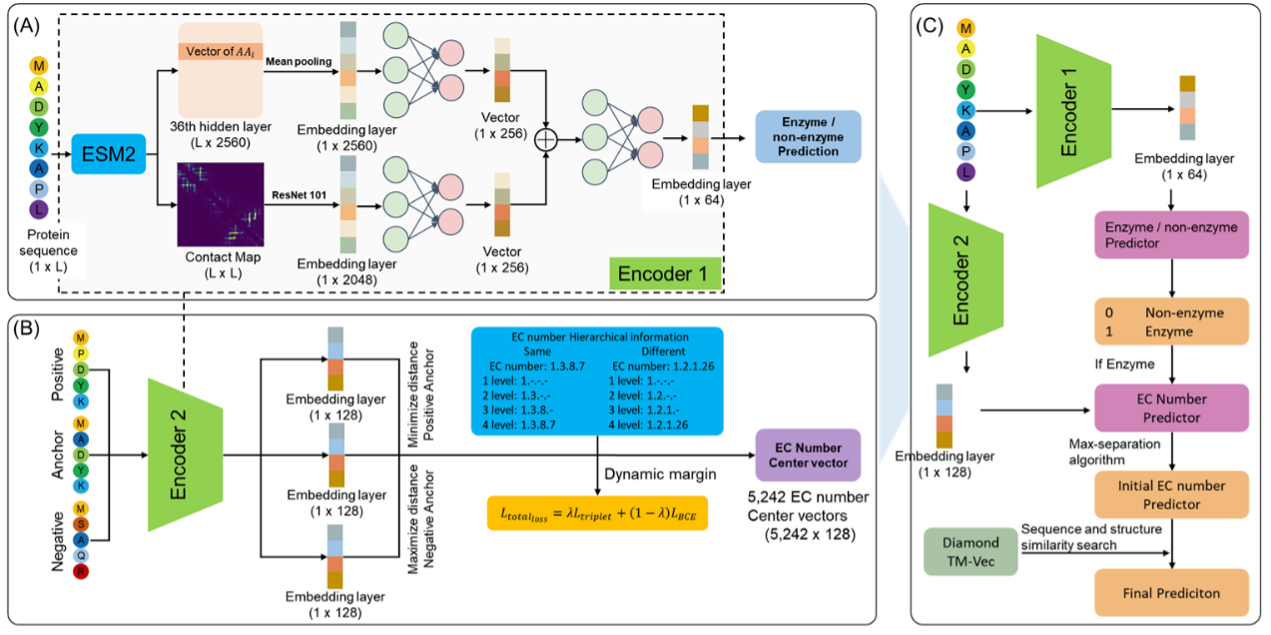
EnzymeHunter Architecture
Architecture and workflow of the EnzymeHunter model:
Installation & Setup
1. Install from PyPI
The project provides both a Python API and a command-line interface for convenient programmatic and command-line use.
conda create -n enzymehunter python=3.9 -y
conda activate enzymehunter
pip install enzymehunter
The PyPI package does not embed the large pretrained weights or reference database. Run the command below to download the model and reference data automatically, or download them manually from Hugging Face:
enzymehunter download-hf-assets \
  --model-dir /data/enzymehunter
This downloads the model/ and data/ trees. The --model-dir value is the assets directory, and the downloader creates model/ and data/ inside it. Then run a prediction without changing directories:
enzymehunter predict input.fasta \
  --model-dir /data/enzymehunter \
  -o results.csv
Use a specific device when needed:
# Automatically choose CUDA when available, otherwise CPU
enzymehunter predict input.fasta --device auto -o results.csv

# Force CPU
enzymehunter predict input.fasta --device cpu -o results.csv

# Use physical GPU 1
enzymehunter predict input.fasta --device cuda:1 -o results.csv

# Model stored outside the default locations
enzymehunter predict input.fasta --model-dir /data/enzymehunter \
  --device cuda:1 -o results.csv
The same operation is available from Python:
from enzymehunter import predict

# Uses ./model by default
predict("input.fasta", "results.csv")

# Use this only when the model is stored elsewhere
predict("input.fasta", "results.csv", model_dir="/data/enzymehunter")
2. Install from source for development
Clone the repository
   git clone https://github.com/cgxbio/EnzymeHunter.git
   cd EnzymeHunter
Create and activate the virtual environment
   conda env create -f environment.yml
   conda activate EnzymeHunter
Data and Model Download
Please download the pretrained data and model files from Zenodo or Hugging Face:
After downloading, place the contents into the following directories:
EnzymeHunter/
├── data/          # Place dataset files here
│   └── pdb/       # (PDB mode) Place PDB files here, named {UNIPROT_ID}.pdb
├── model/         # Place model files here
├── EnzymeHunter.py
├── ...
Usage Example
Here are the common examples of using the EnzymeHunter, corresponding to different running modes:
Normal Mode (Default Mode)
Use this mode when you need the program to automatically distinguish between enzymes and non-enzymes, and only predict EC numbers for proteins classified as enzymes:
# Example: run prediction on a dataset where not all proteins are enzymes
python EnzymeHunter.py --dataset example_test --all_are_enzymes False
Explanation:
- --example_test is your test dataset name (without the .fasta extension)
- --The program will first perform enzyme/non-enzyme classification prediction
- --Only proteins predicted as enzymes (pred_label=1) will undergo subsequent EC number prediction
- --Non-enzyme proteins will be marked with EC number 0.0.0.0
All-Enzymes Mode
Use this mode when you know all proteins in the dataset are enzymes and want to skip the enzyme/non-enzyme classification step, proceeding directly to EC number prediction:
   # Example: run prediction assuming all proteins are enzymes
   python EnzymeHunter.py --dataset example_test --all_are_enzymes True
Explanation:
- --example_test is your enzyme dataset name (without the .fasta extension)
- --The --allareenzymes flag forces the program to treat all proteins as enzymes
- --Skips the enzyme/non-enzyme classification step and proceeds directly to EC number prediction
- --All proteins will have predlabel set to 1 and predprob set to 1.0
PDB-Based Contact Map Mode
By default, EnzymeHunter uses ESM2-predicted contact maps. You can switch to PDB-based contact maps (computed from AlphaFold or ESMFold 3D structures) by setting --contact_map_source pdb:
- Place your PDB structure files (named
{UNIPROT_ID}.pdb) into./data/pdb/ - Run the pipeline with
--contact_map_source pdb:
In this mode, EnzymeHunter will use the model trained with PDB-derived contact maps.
# Normal mode with PDB contact maps
python EnzymeHunter.py --dataset example_test --all_are_enzymes False --contact_map_source pdb

# All-enzymes mode with PDB contact maps
python EnzymeHunter.py --dataset example_test --all_are_enzymes True --contact_map_source pdb
Output
After running, the prediction results will be saved to:
./results/example_test_final_pred_results.csv